Build your Web App!
Get excited and find out how easy it is to build a web app!
Use the right arrow to go to the next step.
Created by RailsGirls team / @railsgirlsbne
Instructions on using this guide
In some sections, you'll have the option of reading more information. Use the down arrow to read this, and when you're finished, use the right arrow to move on to the next step. If you get lost, hit the escape key (ESC) to see an overview of the course, or ask a coach for help.
Get Ready
To build apps and other things with Ruby on Rails, you need to set up 2 accounts, namely GitHub and c9.io .
We need somewhere for you to write code and run a server, and we need somewhere for you to store and share your code so you can work with other people.
Setting up with Cloud9
Follow the link to open the cloud9 setup guide Click here
In Cloud9, the terminal window is at the bottom of your page.
Your Terminal is used to write commands that control the server,
the files you're creating and your
database.
Navigating within the terminal window
In the terminal:
The 'cd' command means 'change directory'.
If you type this in the terminal
lsyou will see a list of folders such as app and config
Want to know how to move back up the directory?
To move back up the directory to Project
In the terminal type:
cd ..We will start up the web server
In the terminal type:
rails server -p $PORT -b $IPClick on the Run Project at the top of the Cloud9 IDE. This is to make sure that the server is running properly.

You just started a server on your computer! A server SERVES up files to people who ask for them. Right now, our server is showing the "Welcome aboard" page when you go to it's "serving" that file up to you when you ask for it by going to that URL.
Lets create something
One of the reasons why Rails is awesome is that it comes with built-in commands that makes it easy for you to get started.
The scaffold command makes it super easy to create a concept by generating all the necessary
files and folders which you don't have to worry about.
It also generates database tables to store information and boilerplate code of how every module
interacts.
Scaffold allows you to create a concept (eg: a user, post, comments) in a single command.
We are going to create the idea concept with the help of scaffold command
rails generate scaffold idea name:string description:text picture:string You have now created the concept called idea that includes:
- Name
- Description
- Picture
The 'string' and 'text' denotes the type of data it will be when stored in the database
There are various types of data you might include, such as:
:binary- stores data such as images, audio files or movies:boolean- stores true or false values:date- stores data in the date format(year/month/day):datetime- stores data in both date and time format:integer- stores data as whole numbers:decimal- stores data in decimal numbers
We asked rails to keep track of the idea concept in the database, and we need to update it. This is called a 'migration'.
In the terminal type:
rails db:migrateLets start our server and see what we have created so far.
In the terminal type:
rails server -p $PORT -b $IPor use the 'Run Project' button at the top of the page of the Cloud9 IDE
Click on the Share button.
Under the 'links to share' section select application and click on the url. Select Open.
Add '/ideas' to the end of the url.
You'll now be able to see the basics of the app you're creating! If you can't see your app, ask a coach for help.
The scaffold command allow Rails developers to create apps really fast.
It creates a lot of building blocks for you so you don't have to do it manually.
Lets look at the folders and directories it has created.
- app/assets/javascripts/ideas.js.coffee
- app/assets/stylesheets/ideas.css.scss
- app/assets/stylesheets/scaffolds.css.scss
- app/controllers/ideas_controller.rb
- app/helpers/ideas_helper.rb
- app/models/idea.rb
- app/views/ideas/
- db/migrate/
- db/schema.rb
- test/controllers/ideas_controller_test.rb
- test/fixtures/ideas.yml
- test/helpers/ideas_helper_test.rb
- test/models/idea_test.rb
That is a whole lot of files we didn't need to create. We will discuss a few that we will be working on.
app/models/idea.rb is the file that keeps track of the model
information for the idea concept.
We'll be working with this file when we add in photos.
app/controllers/ideas_controller.rb helps control and process all the
requests the server gets
for the pages ideas. There are code generated in the file for you which handles the
actions
show, create, edit, delete.
app/views/ideas/ is a directory that holds all the view(HTML files) of the ideas
concept.
This is where you can pretty up the app which we will dive into in the next step.
Lets make things beautiful
tags around it.
HTML tags use angular brackets < >.
Your web browser uses the tags to understand how to display content.
These are tags that we will be using for the app:
link- connects assets to your pagediv- a container for other contenta- link to another pageul- unorder list, needs a list of elementsli- list element, must be part of a list
<% and %>.
The server executes this as Ruby code and then embeds it in existing HTML.
In this tutorial, you will come across <%= RUBY CODE HERE %>, whereby the = comes
after the <% which means the contents written in ruby code will be executed and rendered on the
page.
For instance, if you want to show the number of ideas in your app, the code to render the number will be:
There are <%= Idea.count %> ideas
The next piece of this puzzle that makes the website pretty is CSS(Cascading Style Sheets). As before, HTML keeps track of the contents of the website. CSS keeps track of how the page looks.
At the moment, the app doesn't look nice. Lets go on and add some CSS to pretty it up.
On the left panel of the editor in c9.io, open the file
app/views/layouts/application.html.erb. This is your default layout file.
Look for this line <%= stylesheet_link_tag 'application', media: 'all', 'data-turbolinks-track': 'reload' %>
Add these lines of code above this line.
Make sure you save the file by using the menu bar File -> Save.
The rel="stylesheet" tells us the type of link,in this case a link relation. This basically
tells the browser there is an
external hyperlink to refer to. The href contains the address to the css file which is
//cdnjs.cloudflare.com/ajax/libs/twitter-bootstrap/3.0.3/css/bootstrap.css and
//cdnjs.cloudflare.com/ajax/libs/twitter-bootstrap/3.0.3/css/bootstrap-theme.css.
Here, we are using the style sheet called Bootstrap which is made by the people from Twitter.
Replace the <%= yield %> with
<%= yield %>
The <div> tag provides a way to divide your code into parts.
In this case, we have assigned a class named "container" that will give us access to apply the same styling to that part of code.
We want to have a navigation bar at the top of our page, so that people using our app can find their way
around. We also want to have a footer at the bottom of the page.
In the same file, under <body>
add:
Let's add the footer too. Before </body>, add:
Finally, we're going to make some changes to the way our ideas display. We want to space them out a bit. Open app/assets/stylesheets/application.css
and at the bottom, add:
body { padding-top: 100px; }
footer { margin-top: 100px; }
table, td, th { vertical-align: middle; border: none; }
th { border-bottom: 1px solid #DDD; }
So, what did that CSS do?
body - this part is known as the selector and refers to the HTML element you wish to style.
{ padding-top: 100px; } - this part is known as the declaration; each declaration has a property which is the style attribute you wish to change (padding-top),
and an associated value (100px).
Declarations always end with a semicolon and declaration groups
are always enclosed by curly brackets.
Now lets have a look how did the changes to CSS impact our app
Go to the terminal and type:
rails server -p $PORT -b $IPGo to your browser on and preview the page
Add the '/ideas' to the end of the URL
Adding Images
At the moment, our app can't upload images and we need to install a piece of software to enable that.
In Rails, there are a lot of plug ins that we can incorporate with our app which are called gems
Gems are basically libraries that contains pre-written code so that you don't have to write it from scratch.
Gems are very useful to reduce duplication and errors in your code and are portable to be used in multiple projects.
In your project menu,you'll see a file called Gemfile.
This has all the gems that came with the application we created when we used the
rails newOpen gemfile so you can edit it in the text editor. Under the line,
gem 'sqlite3'gem 'carrierwave'The sqlite3 gem interfaces with our database, and carrierwave
makes it easier to upload images.
Hit CTRL-C in the terminal to stop the server
In the terminal, run this command:
bundle installBundler downloads all the gems that are specified in the Gemfile and tracks the versions to ensure that your project has a consistent environment.
Now, we can generate the code that handles image uploads by doing:
rails generate uploader PicturePlease start your server up again.
Open app/models/idea.rb. Under the line class Idea < ActiveRecord::Base, add:
mount_uploader :picture, PictureUploaderNow, we need to customise the form we use for editing and uploading ideas.
We're using the same bit of code to edit and upload. This code is found in app/views/ideas/_form.html.erb.
The following code snippet (<%= render 'form', idea: @idea %>) is basically calling the above form. That call is used in both edit.html.erb and new.html.erb,
as the two forms are basically identical. If you look at either of those pages (edit.html.erb or new.html.erb)
it just says <%= render 'form', idea: @idea %>.
So lets open this form! As mentioned it can be found in app/views/ideas/_form.html.erb, you will see the code form_with(model: idea, local: true).
This file has HTML code generated for us to create our idea form.
Find <%= form.text_field :picture %> and change it to:
<%= form.file_field :picture, id: :idea_picture %>This changes the code from asking for a text input to asking for a file input, which makes it easier for our users to upload an image.
Did you get an error?
Sometimes, you might get an TypeError: can’t cast ActionDispatch::Http::UploadedFile to string.
If this happens, change the line to this code instead:
<%= form_for @idea, :html => {:multipart => true} do |f| %>In your browser, upload a picture to your idea. When you upload a picture, it doesn't look nice because it only shows the file path, so lets go ahead and fix that.
Open app/views/ideas/show.html.erb and change <%= @idea.picture %> to:
<%= image_tag(@idea.picture_url, :width => 600) if @idea.picture.present? %>Refresh your browser to see what changed.
Let's take a closer look at app/views/ideas/show.html.erb.
In the code <%= @idea.picture %>, @idea is what we call an 'instance variable'. Instance variables are prefixed with an @ symbol. Each view file (files in the app/views folder), has a corresponding controller action, where the instance variables are set.
In our code, @idea is set in the ‘show’ action of the Ideas controller. It's set with the code @idea = Idea.find(params[:id]).
This allows us to use it in the view show.html.erb. It uses the Rails 'find method to get the ideas for our app from our database.
The code that follows the @idea variable (.picture) tells Rails to access the ‘picture’ attribute of our resource (idea).
Our new code, <%= image_tag(@idea.picture_url,:width => 600), uses the Ruby on Rails image_tag helper. This helper generates the HTML code <img> tag, but retrieves the image we want to display from the folder 'public/images' where our uploaded images are stored.
Rails provide helpers that generates HTML code so that you only need to write vital code and not repeat yourself writing boilerplate code.
In the image_tag, we have also specified the width of the image width to 600
Finally, the .present? after @idea.picture is a Rails method to check if the picture exists before proceeding in executing the rest of the code.
Fine-tuning Routes
Our Rails app would need to listen for requests from the browser and provide the correct information through a system called routing.
Requests from the browser are interpreted as specific HTTP(Hypertext Transfer Protocol) methods.
This protocol basically defines how information (usually webpages or webpage components composed of text with hyperlinks - ‘hypertext’), is formatted and transmitted across the internet.
There are 4 HTTP methods:
- GET
- PUT
- POST
- DELETE
Rails routing system ensures the app knows what to do when it receives each of those methods for any of the resources in your app.
In this application Idea is modelled as a resource. A resource is something that can be created, read, updated and deleted
For example, GET /ideas/new will give you the form for adding a new idea.
POST /ideas will create a new idea.
Need more explanation on how routing works?:
Rails’ inbuilt routing system automatically generates routes for each resource that map to specific actions (index, show, new, edit, create, update, delete) defined in the controller.
So, for each of our models, there are seven related actions defined in the associated controller,
ideas_controller.rb
These actions specify the appropriate response (a ‘method’) which is most likely to render the corresponding view,ideas/index.html.erb
If you look in your ideas_controller.rb you can see these actions and the associated behaviour, and the HTTP method that corresponds with each action:
                def show
                    @idea = Idea.find(params[:id])

                    respond_to do |format|
                      format.html # show.html.erb
                      format.json { render json: @idea }
                    end
                  end

                  # GET /ideas/new
                  # GET /ideas/new.json
In this instance, show is the controller action that corresponds with the GET HTTP method.
To get a better picture of how each HTTP Method, path(address in the browser address bar) and controller action tie up together, the table below clearly illustrates it
| HTTP Method | Path | Controller Action | used for |
| GET | /ideas | index | displaying a list of all ideas |
| GET | /ideas/new | new | returning an HTML form for creating a new idea |
| POST | /ideas | create | creating a new idea |
| GET | /photos/:id | show | displaying a specific photo |
| GET | /photos/:id/edit | edit | returning an HTML form for editing a specific photo |
| PUT | /photos/:id | update | updating a specific photo |
| DELETE | /photos/:id | destroy | deleting a specific photo |
We are going to change some of the routes we have set up. When you open the application it still has the Ruby 'Welcome Aboard' message.
We had to manually go to /ideas.
Open config/routes.rb. After the first line, add:
root :to => redirect('/ideas')This changes the default page (root) that is returned when a browser requests your app to the /ideas page. Try it out now (don't forget to save your changes first, and
restart the server if you've stopped it).
Lastly, we are doing to add a static page to our app. This one is going to
provide information about the author of the app - you!
In the terminal, type:
rails generate controller pages infoThis created a new folder called 'pages', which you can find under app/views.
In that folder, you'll see a page called info.html.erb. Open it up.
You can customise the information in this page.
If you add /pages/info to your application's URL now, you'll see this page.
Push your app to GitHub

Earlier, you created a GitHub account.
Now, we are going to add your new app to GitHub.
Open the GitHub website and log in.
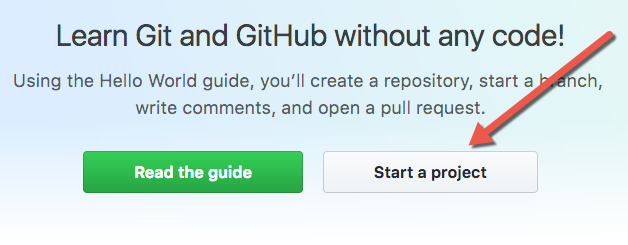
Click the Start a Project button.
Give the repository a name, such as rails-girls.
You can also add a description.
Choose the 'Public Repository' option and make sure you untick the 'Initialize this repository with a README' box.
Finish creating the repository by clicking 'Create repository'.
Go back to Cloud9. Make sure you are still in your project directory.
You can check this by looking at the terminal. It should show something like this:
your_username@railsgirls:~/workspace $If you are not, use the cd command you learned earlier to change back into that directory.
In the terminal, type:
git initThis initializes your local git repository. Remember: git runs on your computer; GitHub stores your code online.
Let's add your code to your local repository. In the terminal, type:
git add .The . means all files in this directory. So, this command will get us ready to add all our files to our computer's repository.
Git has an intermediary stage before it saves any changes. This is called 'staging', and it allows you to make sure everything is correct, so you can commit (save) them.
You're now ready to make your first commit! In the terminal, type:
git commit -m "my first commit"This commits all of your files to your computer's (local) git repository. The words between the "" is your commit message. This tells other people looking at your code what you are doing. You can be more descriptive in your commit messages to describe what you have done
Now, you need to send the code to GitHub, so you can share it and collaborate on it if you want. In the terminal type:
git remote add origin https://github.com/yourusername/yournewrepositoryname.gitThis makes a remote connection to the GitHub repository you've typed. We normally call this 'origin', as it's the original version.
The exact instructions for you will be on github and will be similar to below
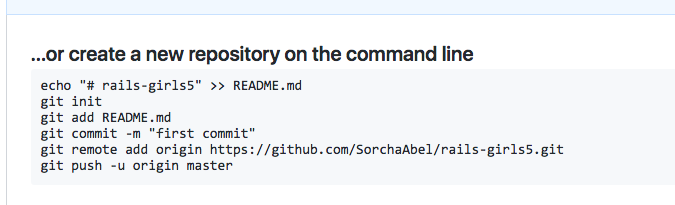
Now the two repositories(your computer and Github) are connected, you need to push your computer's code to GitHub. In the terminal, type:
git push -u origin masterpush command uploads your code to Github in particular to the master branch.
Your code is now on GitHub! On the GitHub website, open up the repository you created.
Congratulations! You've built your basic app.
So, what next?