
Rails Girls Sinatra App Guide
*Created by Sorcha Abel Follow @sabel25
What is Sinatra?
Getting Started
1. Creating the application with Cloud9
Follow the steps outlined in the Rails Girls Cloud9 Sinatra Setup Guide Cloud9 Setup
2. Write a description for your application
Cloud9 automatically creates a file called REAMDME.md. The .md extension means that this is a MarkDown file.
A readme file is useful for documenting what your application does, and how a developer can setup their environment to develop or run your application.
There is no clearly defined Markdown standard, however, GitHub has their own flavor(sic).
- Double click the
README.mdin the Cloud9 file explorer to open it. - Replace the contents of the file with your description.
- Save the file.
eg.
# My awesome Sinatra app!
This app is like the RailsGirls Ideas app, but using Sinatra instead of Rails!
We will add more documentation as the project evolves.
3. Git
While you are developing your app, you should be committing your changes and pushing them to a remote repository, such as GitHub.
We’ll start by initialising git within our app and adding the current files.
- Run the git initialiser. To do this simply enter the command below into the terminal window in Cloud9
git init- Commit the app to git
git add .
git commit -m "Initial commit"
You can modify the Initial commit message to anything you like.
The next step is to create a remote repository on GitHub and add it to your app.
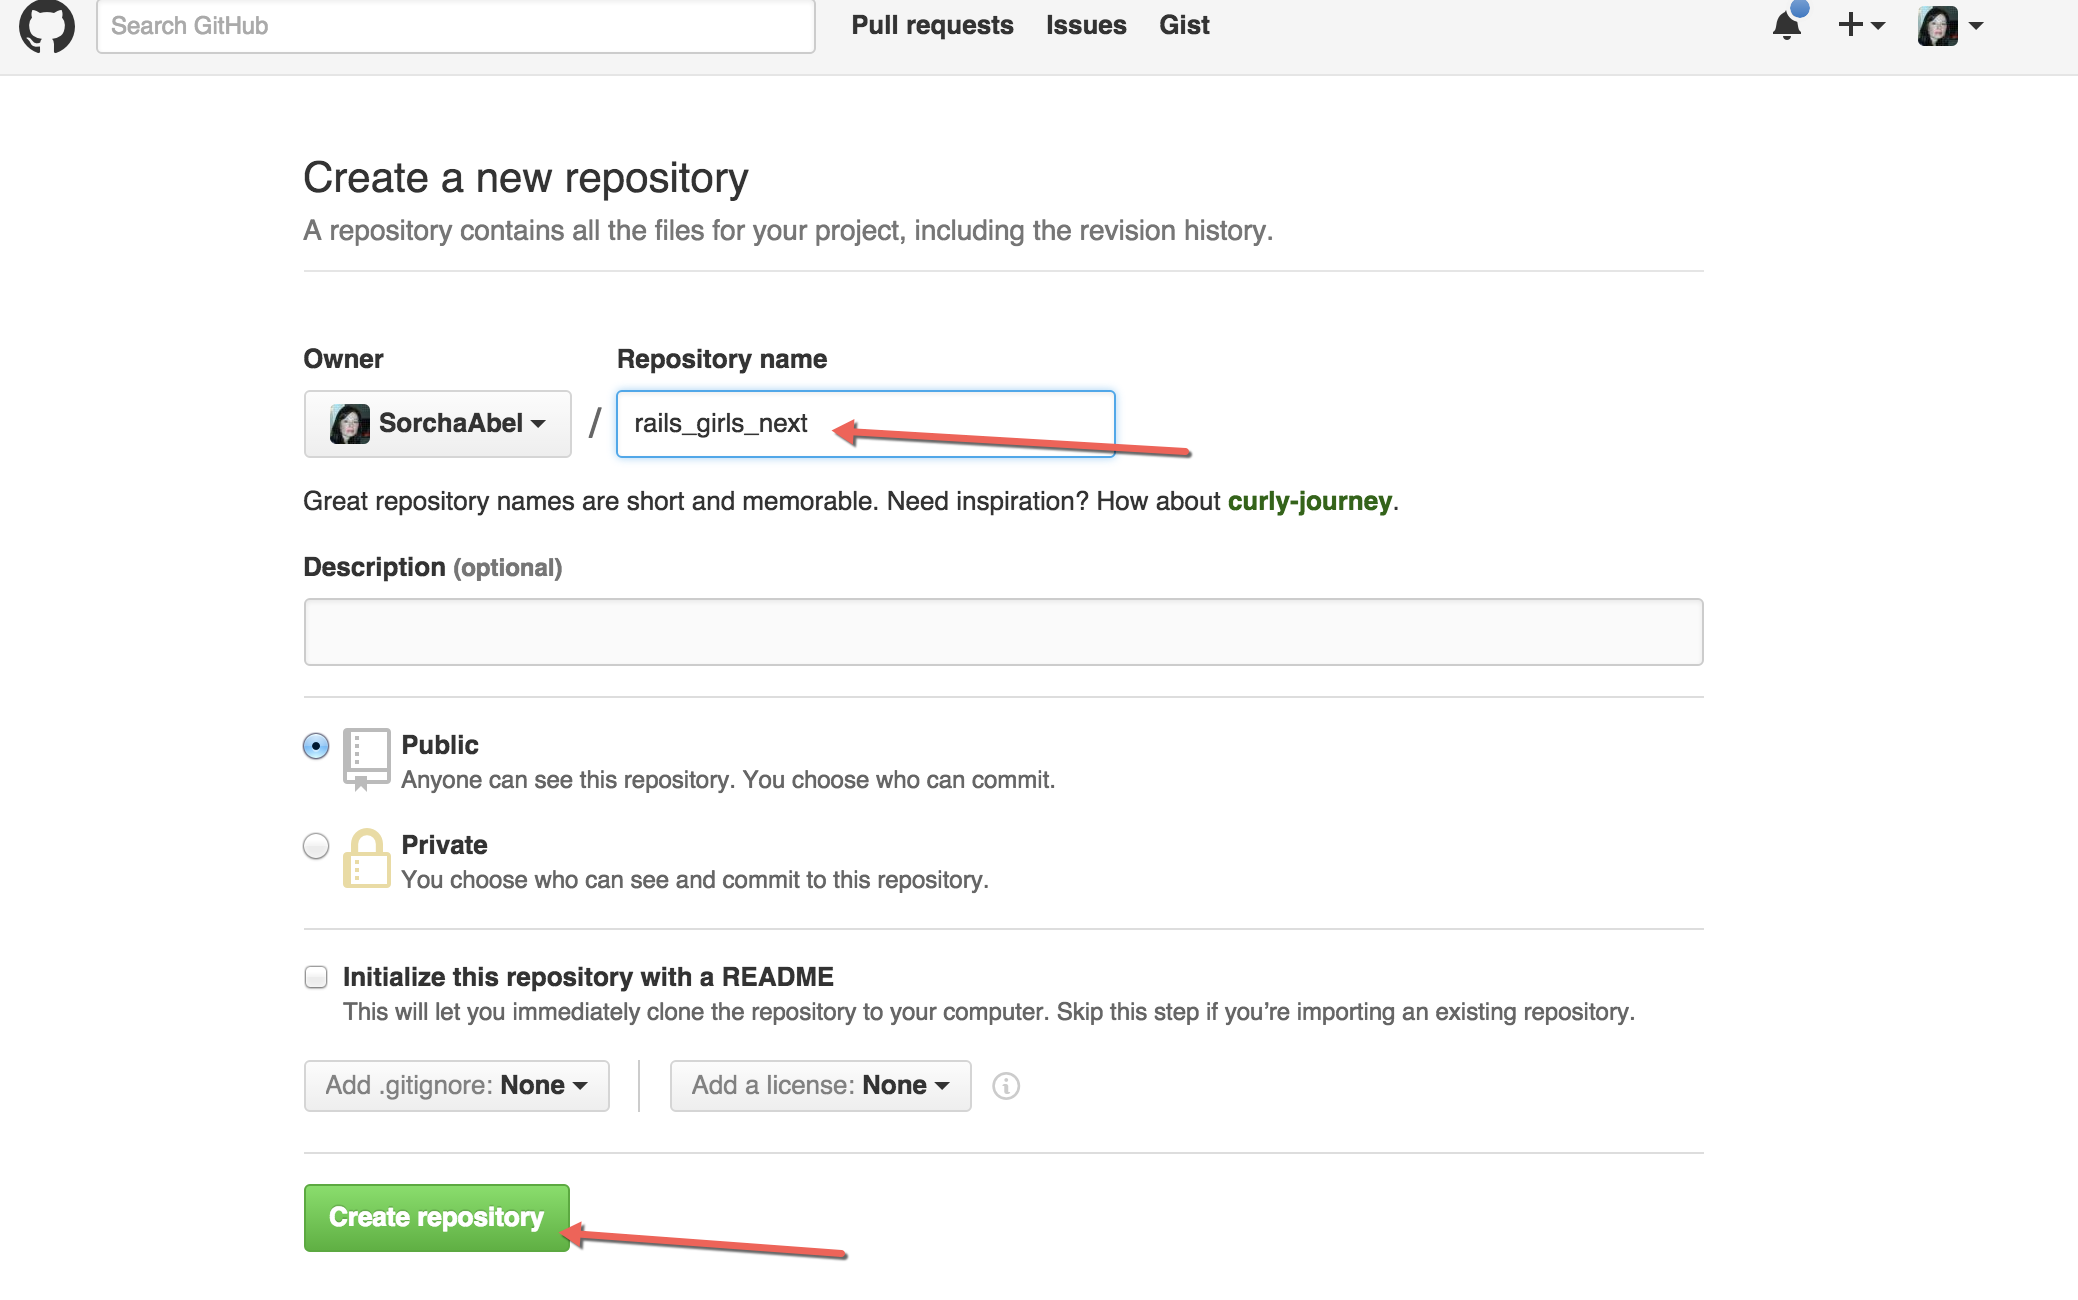
- Log onto GitHub and start a project
- Give your repo a title and a description
- Follow the instructions on GitHub under the heading
…or push an existing repository from the command line
They will be similar to below. DO NOT copy the lines below. You must push to your own newly created repo
git remote add origin https://github.com/YourName/project_name.git
git push -u origin master
Whenever you wish to commit your changes to GitHub, enter the following(change the message!):
git add .
git commit -m "Change this message to describe your changes!"
git push origin master
Start Coding
4. Create a Gemfile
There are a few gems we will need to install before we can start coding. The easiest way to install gems is by using the bundler gem.
Simply run gem install bundler before proceeding.
Bundler uses a Gemfile to record which gems our app needs.
We need to manually create this Gemfile for our app. This can be done from the terminal window or the Cloud9 file explorer window.
To use the Cloud9 explorer window, right mouse-click and select New file. Rename this file from Untitled to Gemfile.
To use the terminal:
touch GemfileA Gemfile will now appear in the Cloud9 file explorer window. Double click to open it and type in the following code which specifies which gems we want included in our application:
source 'https://rubygems.org'

gem "sinatra"
gem "rake"
gem "sqlite3"
gem "activerecord"
gem "sinatra-activerecord"

group :development do
  gem "sinatra-contrib"
  gem "tux"
end
Save the Gemfile (command ⌘ + s(mac), control + s(windows and linux) or use the menu option File -> Save).
Commit your Gemfile to git:
git add .
git commit -m "Created Gemfile"
git push origin master
Any time you edit a Gemfile you must install the new gems. To do so, run the following command in the terminal window:
bundle installTo update your gems to their latest version, run:
bundle updateCommit the Gemfile.lock file:
git add .
git commit -m "bundle install"
git push origin master
Quick Overview of the gems
sinatra allows us to use the Sinatra DSL (Domain Specific Language) in our app.
rake is used to run automated tasks, like creating and migrating the database.
sqlite3 is the database we will be using to store data.
activerecord is the interface the app uses to communicate with the database.
sinatra-activerecord is a bridge that allows us to use Active Record in a Sinatra application.
tux allows us to interact with the database through the command line.
sinatra-contrib will reload our app, so we don’t have to stop and start the server whenever a minor change is made.
5. Project Structure
Sinatra doesn’t impose any structure on your project (which can be both a blessing and a curse). The entire structure of the project is in your hands and this flexibility can cause headaches. The structure outlined in this app is a pattern that can work well for many of your future Sinatra apps.
In the next section we will focus on file and folder creation. Pay particular attention to where you create files/folders. Ask an instructor if you are unsure.
5a. File/Folder Creation
The instructions given will show you how to create files and folders through the terminal window. You can however create all files and folders by right clicking in the Cloud9 explorer window as we did above. If you feel comfortable with file and folder creation follow the structure in the image below and skip to the next section.
From the terminal create a folder called app by executing the following command:
mkdir appChange to the app folder and create three subfolders:
cd app
mkdir models views controllers
You have just created a major component of our application’s structure:
- models (database communication)
- views (what the end user sees)
- controllers (lots of routes for our app)
From the terminal window, move up one level of the project structure and into the root of the project:
cd ..First we will create a folder called files. This folder will contain the files that we upload from our app. Next we will create a folder called config. Then we will create a file called application.rb inside the newly created config folder. application.rb is the file that will load all the files needed by our application. Finally we will create a file called database.yml that will manage our database connections.
mkdir files
mkdir config
cd config
touch application.rb
touch database.yml
From the terminal window, move up one level of the project structure and into the root of the project. From here create another folder called db. This will store information about our sqlite3 database including our database migrations.
cd ..
mkdir db
We are almost there. The final step in our skeleton structure for our application is to create a config.ru file in the root of the project. The config.ru file is a convention that is required by certain deployment procedures and tools (like shotgun, tux, and Heroku). We also create a Rakefile to describe any automated tasks.
touch config.ru
touch Rakefile
Congratulations! You may not realise it yet but you have just created a solid basic structure for a Sinatra app that you can reuse time and time again.
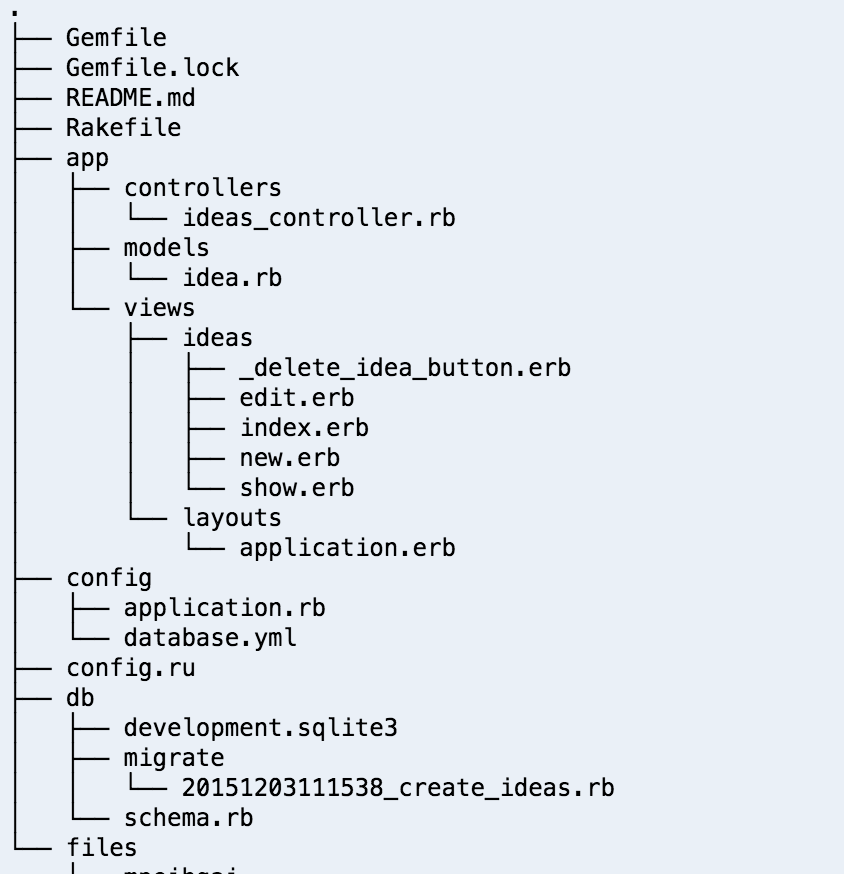
By the time our application is complete, it should look similar to the folder structure below:
5b. Commit the skeleton to git
If you wish to commit this skeleton folder structure to git, you may notice that the empty folders we created aren’t being committed; git will only remember files, not folders. To make git remember our structure, you must create a file inside each empty folder. The convention is to create a file called .keep. The dot at the start of the name means that your computers operating system should ignore them.
touch app/.keep
touch app/controllers/.keep
touch app/models/.keep
touch app/views/.keep
touch db/.keep
touch files/.keep

git add .
git commit -m "folder structure"
git push origin master
6. Configure the App
The first step is to set up the application.rb file. Double click on the file to open it (you will find it under the config folder). Take some time to understand what we are about to put into this file.
Note you must save all files in cloud9 (command ⌘ + s(mac), control + s(windows and linux) or menu options File -> Save)
# require gems and classes
require 'bundler'
Bundler.require
$: << File.expand_path('../', __FILE__)
Dir['./app/**/*.rb'].sort.each { |file| require file }

# configure sinatra
set :root, Dir['./app']
set :public_folder, Proc.new { File.join(root, 'assets') }
set :erb, :layout => :'layouts/application'
Lets examine the first four lines in a bit more detail:
require 'bundler' enables our application to automatically discover the Gemfile.
Bundler.require loads into the project all the gems that are specified in the Gemfile.
$: << File.expand_path('../', __FILE__) adds the entire project to $LOAD_PATH. This allows Sinatra to find all the files you’ve added to the project.
For more on $LOAD_PATH read the Rails Girls Brisbane blog post
Dir[’./app/**/*.rb’].sort.each { |file| require file } This line explicitly requires each file found in our model, view and controller folders.
Even though we haven’t set them up yet, we know the project is going to need these files.
The last three lines of application.rb sets the root of the project and tells the application where the erb (embedded Ruby) files and CSS files are located.
6a. Rake
We need to set up our Rake file so we can run our helper tasks. Open the file Rakefile and add the following code:
require './config/application'
require 'sinatra/activerecord/rake'
6b. ActiveRecord
The final step in our setup is the database.yml file. This file will contain our sqlite database configuration and is required for connecting to the database. Open the config folder and double click to open the file. Copy and paste the lines below.
sqlite: &sqlite
  host: 127.0.0.1
  adapter: sqlite3

development:
  <<: *sqlite
  database: db/development.sqlite3

production:
  <<: *sqlite
  database: db/production.sqlite3

test:
  <<: *sqlite
  database: db/test.sqlite3
6c. Commit your setup
git add .
git commit -m "Setup and configuration"
git push origin master
7. Migrations
Just like we did in the original Rails Girls, we need to create an ideas table so we can save our ideas. From the terminal window run:
rake db:create_migration NAME=create_ideasA migration file will have been created in the db/migrate folder. The name of the file is of the form YYYYMMDDHHMMSS_create_ideas.rb. The timestamp determines which migration should be run and in what order. Double-click to open it and enter the following. This is similar to the scaffold command you ran in Rails Girls.
class CreateIdeas < ActiveRecord::Migration
  def change
    create_table :ideas do |t|
      t.string :name
      t.text :description
      t.string :picture

      t.timestamps null: false
    end
  end
end
Each time we create a migration, it needs to be run so that the changes get applied to the database. Open the terminal window and type:
bundle exec rake db:migrateThis will create the ideas table inside the db/development.sqlite3 database. You can see it in the schema file, db/schema.rb.
7a. Commit your migration and schema, Ignore the database
Because our database might contain sensitive or private data, we do not want to commit it to git. git will ignore any files listed in a .gitignore file.
Create the .gitignore file using the Cloud9 file explorer or through terminal:
touch .gitignoreCloud9 will sometimes hide files starting with a dot, but we need to see it.
Click the “cog” icon in the upper right corner of the file explorer to open the Cloud9 preferences tab. Under User Settings select Tree & Navigate and removed the .* from the hidden file patterns options. If unsure ask an instructor.
Open the .gitignore file and enter the following, to ignore all sqlite3 databases.
*.sqlite3Now commit everything to git
git add .
git commit -m "database migration and .gitignore"
git push origin master
8. Project Code
We have just created the ideas table by running the migration, so let’s now create the corresponding model. Navigate to the app/models folder and create the idea.rb file (right click in cloud9 file explorer window or use the terminal window). We will use the terminal window.
touch app/models/idea.rbDouble click to open the file and enter the following code:
class Idea < ActiveRecord::Base

end
This is just an empty file at this stage, we will add code to it later on.
9. Routes
Finally it is time to create routes. Routes are simply the rules that tell your application which code to run for a given URL. From the controllers folder, create a file called ideas_controller.rb (you can use the terminal window or cloud9 file explorer)
%w(/ /ideas).each do |path|
  get path do
    @ideas = Idea.all
    erb :'ideas/index'
  end
end
This route will map the URL ideas/index to a listing of all ideas. We have just told Sinatra to look in the ideas folder for an html file called index.erb (it has a .erb suffix rather than .html because it contains embedded Ruby as well as html).
Now that we have created our route we now need to create a corresponding index page to display it. Create a folder for ideas in the app/views/ directory (from terminal window mkdir app/views/ideas or use the cloud9 file explorer window). Then create a file called index.erb.
10. Views
Type or paste the following into the index.erb file you just created
<h1>Listing Ideas</h1>

<table>
  <thead>
    <tr>
      <th>Name</th>
      <th>Description</th>
      <th>Picture</th>
      <th colspan="3"></th>
    </tr>
  </thead>

  <tbody>
  <% @ideas.each do |idea| %>
    <tr>
      <td><%= idea.name %></td>
      <td><%= idea.description %></td>
      <td><%= idea.picture.present? %></td>
      <td><a href="/ideas/<%= idea.id %>/edit">Edit</a></td>
      <td><a href="/ideas/<%= idea.id %>">Show</a></td>
      <td><% if idea.picture %><a href="/files/<%= idea.picture %>">View Picture</a><% end %></td>
      <td><% if idea.picture %><a href="/files/<%= idea.picture %>/download">Download Picture</a><% end %></td>
    </tr>
  <% end %>
  </tbody>
</table>
<br>
10a. Commit your ideas model, controller and view
git add .
git commit -m "Ideas model, controller and view"
git push origin master
11. Improving our design
Although our application currently has only one page, it will eventually have many pages. To give it a consistent look and feel, we will want to have the same header and footer on each page. Instead of copying and pasting the header and footer onto each page, and having to edit each page if we want to make a change, we will create one file that will contain all the common page content. This is an example of adhering to the DRY (Don’t Repeat Yourself) principle of Ruby programming.
Create a subfolder of views folder and call it layouts. Then create a file in the layouts folder and call it application.erb.
Enter the following html/erb code:
<!DOCTYPE html>
<html>
  <head>
    <title>Workspace</title>
    <script src="https://code.jquery.com/jquery-2.1.4.min.js"></script>
    <!-- Latest compiled and minified CSS -->
    <link rel="stylesheet" href="https://maxcdn.bootstrapcdn.com/bootstrap/3.3.5/css/bootstrap.min.css">
    <!-- Optional theme -->
    <link rel="stylesheet" href="https://maxcdn.bootstrapcdn.com/bootstrap/3.3.5/css/bootstrap-theme.min.css">
    <!-- Latest compiled and minified JavaScript -->
    <script src="https://maxcdn.bootstrapcdn.com/bootstrap/3.3.5/js/bootstrap.min.js"></script>
    <!-- Application CSS -->
    <link rel="stylesheet" type="text/css" href="css/application.css">
    <!-- Application JS -->
    <script src="js/application.js"></script>
  </head>
  <body>
    <nav class="navbar navbar-default navbar-fixed-top" role="navigation">
      <div class="container">
        <div class="navbar-header">
          <button type="button" class="navbar-toggle" data-toggle="collapse" data-target=".navbar-collapse">
            <span class="sr-only">Toggle navigation</span>
            <span class="icon-bar"></span>
            <span class="icon-bar"></span>
            <span class="icon-bar"></span>
          </button>
          <a class="navbar-brand" href="/ideas">The Idea app</a>
        </div>
        <div class="collapse navbar-collapse">
          <ul class="nav navbar-nav">
            <li class="active"><a href="/ideas">Home</a></li>
            <li class="active"><a href="/new">New Idea</a></li>
            <li class="active"><a href="/about">About Me</a></li>
          </ul>
          <p class="navbar-text pull-right">
        </div>
      </div>
    </nav>
    <div class="container">
      <% @flash.each do |type, content| %>
        <% if content.respond_to?('each') %>
          <% content.each do |item| %>
            <%= render 'alert',
                       type:    type,
                       content: item %>
          <% end %>
        <% end %>
      <% end if @flash %>

      <%= yield %>
    </div>
    <footer>
      <div class="container">
        Rails Girls <%= Time.now.year %>
      </div>
    </footer>
    <script src="//cdnjs.cloudflare.com/ajax/libs/twitter-bootstrap/3.0.3/js/bootstrap.js"></script>
  </body>
</html>
11a. Commit your layout
git add .
git commit -m "Application layout view"
git push origin master
12. Preview in a browser
In order to start the server, you need to be in the root directory of your project. Use cd .. repeatedly from your terminal window until you return to your workspace. Don’t worry if you go back too far, simply cd workspace will bring you back to where you should be. Ask an instructor if unsure.
From the terminal window run the following to start the server:
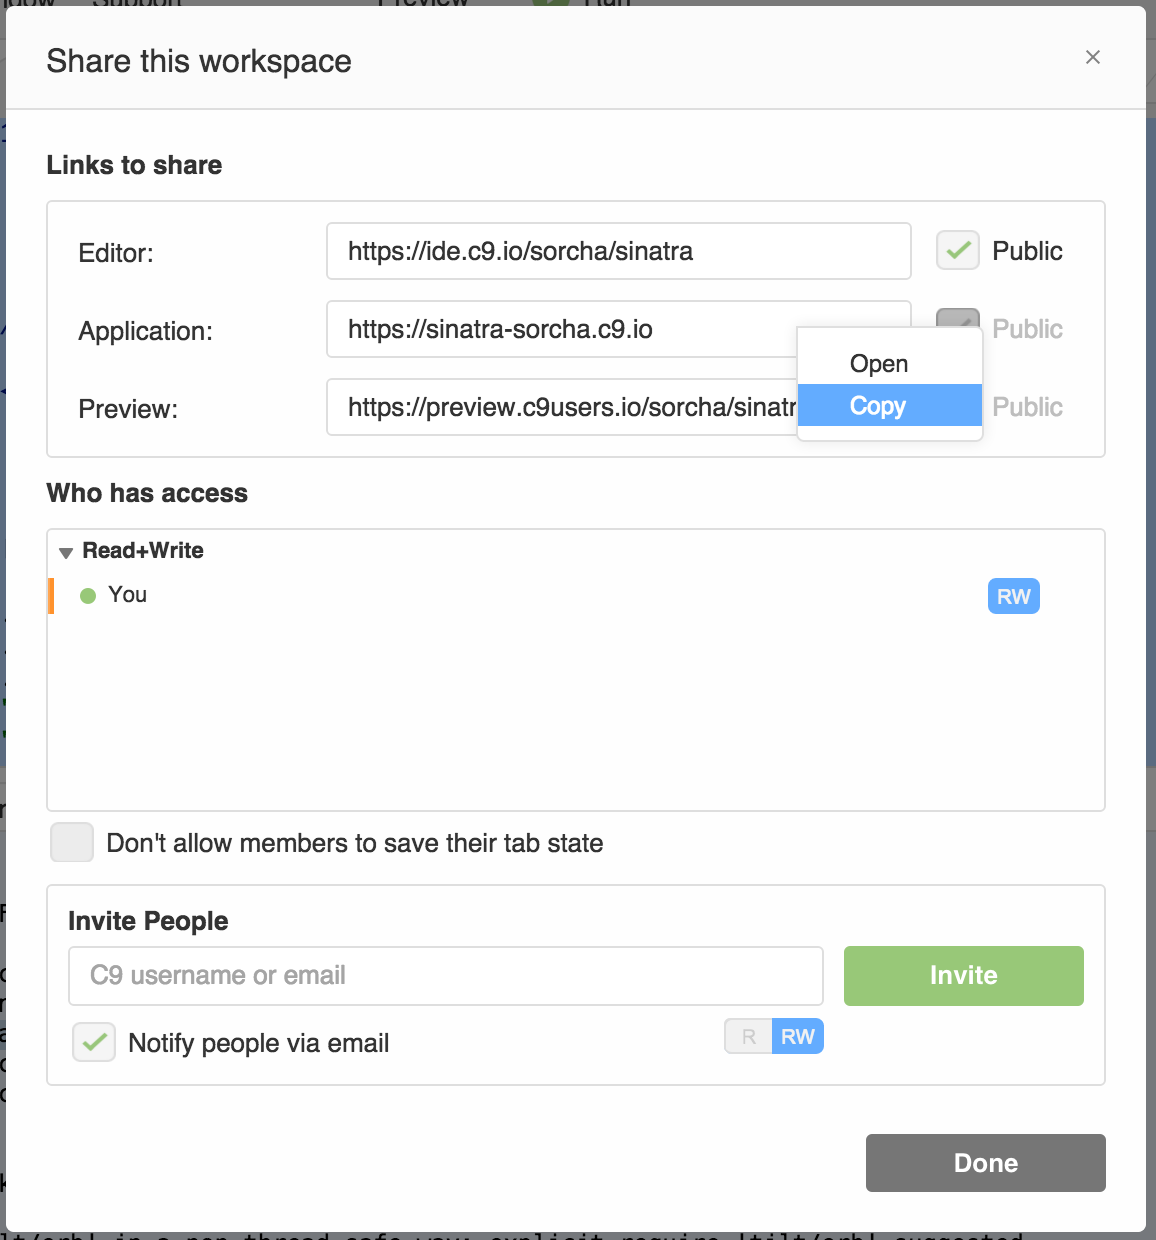
ruby config/application.rb -p $PORT -o $IPFrom the cloud 9 IDE click the share button on the right hand upper window. From the second option (Application:), click on the link and select the copy option. Then navigate to your browser and paste the url into the browser window.
You should now see the ideas app running in the browser! ctrl+c will terminate the server. At this stage there is a small style issue with your app, it doesn’t display as well as it should. We will cover this in a following section.
13. New Route and View
Generally speaking each route will have a corresponding view. Let’s create a route and a view for when we are ready to create a new idea.
Open the ideas_controller.rb file and add the following code after the last line:
%w(/new /ideas/new).each do |path|
  get path do
    @title = 'New Idea'
    @idea  = Idea.new
    erb :'ideas/new'
  end
end
Now we need to create the view to allow our users to add a new idea.
Navigate to the views/ideas folder and create a new file called new.erb. Add the following code:
<h1><%=@title %></h1>
<form action="/ideas" method="post" enctype="multipart/form-data">
  <label for="idea_name">Name:</label>
  <br />
  <input id="idea_name" name="idea[name]" type="text" value="<%= @idea.name %>" />
  <br />

  <label for="idea_description">Description:</label>
  <br />
  <textarea id="idea_description" name="idea[description]" rows="5"><%= @idea.description %></textarea>
  <br />

  <label for="idea_picture">Picture:</label>
  <br />
  <input type="file" id="idea_picture" name="idea[picture]" rows="5"><%= @idea.picture %>
  <br />

  <input type="submit" value="Create Idea" />
</form>
Let’s pause for a moment to review what we have just done. Our first step was to create a route for the new action. We did that in the ideas_controller.rb file.
We set up two variables that will be used by the new view, @title and @idea. @title is just the text that appears at the top of the web page. @idea is a variable that will hold all the data we will enter into our form and eventually insert into the database.
Finally, with the line erb :'ideas/new' we defined a route that will link the URL ideas/new to the “New Idea” view.
When the “Create Idea” button is pressed on the form, it will POST the form data back to our server. We need a route to consume that data and persist it to the database. Add the following route to the ideas_controller.rb file.
post '/ideas' do
  if params[:idea]
    @idea           = Idea.new(params[:idea])
    if params[:idea][:picture] && params[:idea][:picture][:filename] && params[:idea][:picture][:tempfile]
      filename      = params[:idea][:picture][:filename]
      @idea.picture = filename
      file          = params[:idea][:picture][:tempfile]
      FileUtils.copy_file(file.path,"files/#{@idea.picture}")
    end
    if @idea.save
      redirect '/ideas'
    else
      erb :'ideas/new'
    end
  else
    erb :'ideas/new'
  end
end
13a. Preview in a browser
From the terminal window run the following to start the server:
ruby config/application.rb -p $PORT -o $IPFrom the Cloud 9 IDE click the share button on the right hand upper window. From the second option (Application:), click on the link and select the copy option. Then navigate to your browser and paste the url into the browser window.
You should now see the ideas app running in the browser. ctrl + c will terminate the server.
14. More routes
So now we can add an idea in our app and save it to the database. But what about retrieving an idea from the database? The next route in our application will allow us to retrieve just one idea from our database.
Navigate to ideas_controller.rb and enter the following route:
get '/ideas/:id' do
  @idea = Idea.find(params[:id])
  erb :'ideas/show'
end
Similar to before this route is calling erb :'ideas/show' so let’s create that file now. Navigate to the views/ideas folder and create a file called show.erb. Add the following code:
<p>
  <strong>Name:</strong>
  <%= @idea.name %>
</p>

<p>
  <strong>Description:</strong>
  <%= @idea.description %>
</p>

<p>
  <strong>Picture:</strong>
  <%= @idea.picture if @idea.picture.present? %>
</p>
<p>
  <%= delete_idea_button(@idea.id) %>
</p>
15. Delete routes
So now we can view a list of all our ideas, we can create a new idea, and we can view a single idea. But what if we want to delete an idea that we have previously added?
Navigate to ideas_controller.rb and enter the following code:
helpers do
  def delete_idea_button(idea_id)
    erb :'ideas/_delete_idea_button', locals: { idea_id: idea_id }
  end
end
This is called a helper route. It is referring to a view called ideas/_delete_idea_button so let’s create that.
Navigate to the views/ideas folder and create a new file called _delete_idea_button.erb. Be sure to include the underscore.
Open the newly created file and enter the following code:
<form action="/ideas/<%= idea_id %>" method="post">
  <input type="hidden" name="_method" value="delete" />
  <input type="submit" value="Delete Idea" />
</form>
Finally we need to create the route that will do the actual deleting. Return to the ideas_controller.rb file and enter the following
delete '/ideas/:id' do
  Idea.find(params[:id]).destroy
  redirect '/ideas'
end
Lets preview our changes in the browser. From the terminal window run the following to start the server:
ruby config/application.rb -p $PORT -o $IPNote that to delete an idea, you must first open the idea (click on Show). From there you should see the Delete button.
16. Updating an Idea
We are almost done! The final piece of database functionality it to retrieve a single idea and update it. As we did in the previous steps, let’s start by creating a new route. Add the following code to ideas_controller.rb:
get '/ideas/:id/edit' do
  @idea = Idea.find(params[:id])
  erb :'ideas/edit'
end
Again we see the route is calling a view erb :'ideas/edit'. Let’s create it by navigating to views/ideas and creating a file called edit.erb with the following code:
<h1>Edit Idea</h1>
<form action="/ideas/<%= @idea.id %>" method="post" enctype="multipart/form-data">
  <input type="hidden" name="_method" value="put" />

  <label for="idea_name">Name:</label>
  <br />
  <input id="idea_description" name="idea[name]" type="text" value="<%= @idea.name %>" />
  <br />

  <label for="idea_description">Description:</label>
  <br />
  <textarea id="idea_description" name="idea[description]" rows="5"><%= @idea.description %></textarea>
  <br />

  <label for="idea_picture">Picture:</label>
  <br />
  <input type="file" id="idea_picture" name="idea[picture]" rows="5"><%= @idea.picture %>
  <br />

  <input type="submit" value="Update Idea" />
</form>
As with the new action above, we know we will need to create a second route to update the database with the new data. Navigate back into ideas_controller.rb and add the following code:
put '/ideas/:id' do
  if params[:idea].try(:[], :picture)
    file      = params[:idea][:picture][:tempfile]
    @filename = params[:idea][:picture][:filename]
  end

  @idea = Idea.find(params[:id])

  if @idea.update_attributes(params[:idea])
    if @filename
      @idea.picture = @filename
      @idea.save
      File.open("./files/#{@filename}", 'wb') do |f|
        f.write(file.read)
      end
    end
    redirect "/ideas/#{@idea.id}"
  else
    erb :'ideas/edit'
  end
end
Lets preview our changes in the browser. From the terminal window run the following to start the server:
ruby config/application.rb -p $PORT -o $IPWe have left out an important route for our app: managing the files we uploaded. To keep things simple let’s create a new controller that will deal with the files in our app.
Navigate to the app/controllers folder and create a new controller called files_controller.rb. Add the following code to create the required routes:
get '/files/:filename/download' do |filename|
  send_file "./files/#{filename}", :filename => filename, :type => 'Application/octet-stream'
end

get '/files/:filename' do |filename|
  send_file "./files/#{filename}"
end
Let’s try to download or view our files in the browser. From the terminal window run the following to start the server:
ruby config/application.rb -p $PORT -o $IP17. CSS
Lets add some css to our app.
Using the terminal window cd into the app folder and then do the following (again you can use the Cloud9 file explorer to create these folders)
mkdir app/assets
mkdir app/assets/css
touch app/assets/css/application.css
Lets open our newly created application.css file and add the following code:
body { padding-top: 100px; }
footer { margin-top: 100px; }
table, td, th { vertical-align: middle; border: none; color: brown; }
th { border-bottom: 1px solid #DDD; }
Let’s preview our changes in the browser. From the terminal window run the following to start the server:
ruby config/application.rb -p $PORT -o $IP17.a Final commit to github
git add .
git commit -m "My sinatra app is finished"
git push origin master
18. The End
Congratulations you have just completed your first Sinatra app!
Next Steps
Keep in touch!! We love to hear from you.
Follow us on twitter
Sorcha Follow @sabel25
Rachelle Follow @RachelleOnRails
Rails Girls Brisbane Follow @railsgirlsbne
Read the Rails Girls Brisbane blog http://railsgirlsbne.com/
Email us: Rails Girls Brisbane
Join our Facebook Group: Rails Girls BNE Group